How to Do a Plank: The Ultimate Guide to Perfect Form and Variations
Core strength is the foundation of all physical movement. From lifting heavy groceries to maintaining excellent posture at your office desk, your core muscles are constantly working behind the scenes. When it comes to building this vital area, one exercise reigns supreme: the plank. It requires zero equipment, can be performed anywhere, and engages almost every muscle group in your body simultaneously.
However, despite its simplicity, executing a plank with flawed technique can do more harm than good. Many fitness enthusiasts unknowingly strain their lower back or neck due to poor alignment. If you want to maximize your fitness results and stay injury-free, you need to understand how to do a plank correctly and master how to do a proper plank.
In this comprehensive, 3,000-word mega-guide, we will break down every aspect of this powerhouse exercise. We will cover how to do a perfect plank step-by-step, review common mistakes, dive deep into beginner and advanced variations, and answer every question regarding duration, weight loss, and frequency.
Part 1: The Anatomy of a Perfect Plank – Step-by-Step Foundations
To truly grasp how to correctly do a plank, you must treat it as a full-body contraction, not just a passive hold. Your glutes, quadriceps, shoulders, and entire abdominal wall must fire up together. Let’s look at the two primary setups that form the bedrock of core training: the forearm plank and the high plank.
1. How to Do a Forearm Plank Correctly
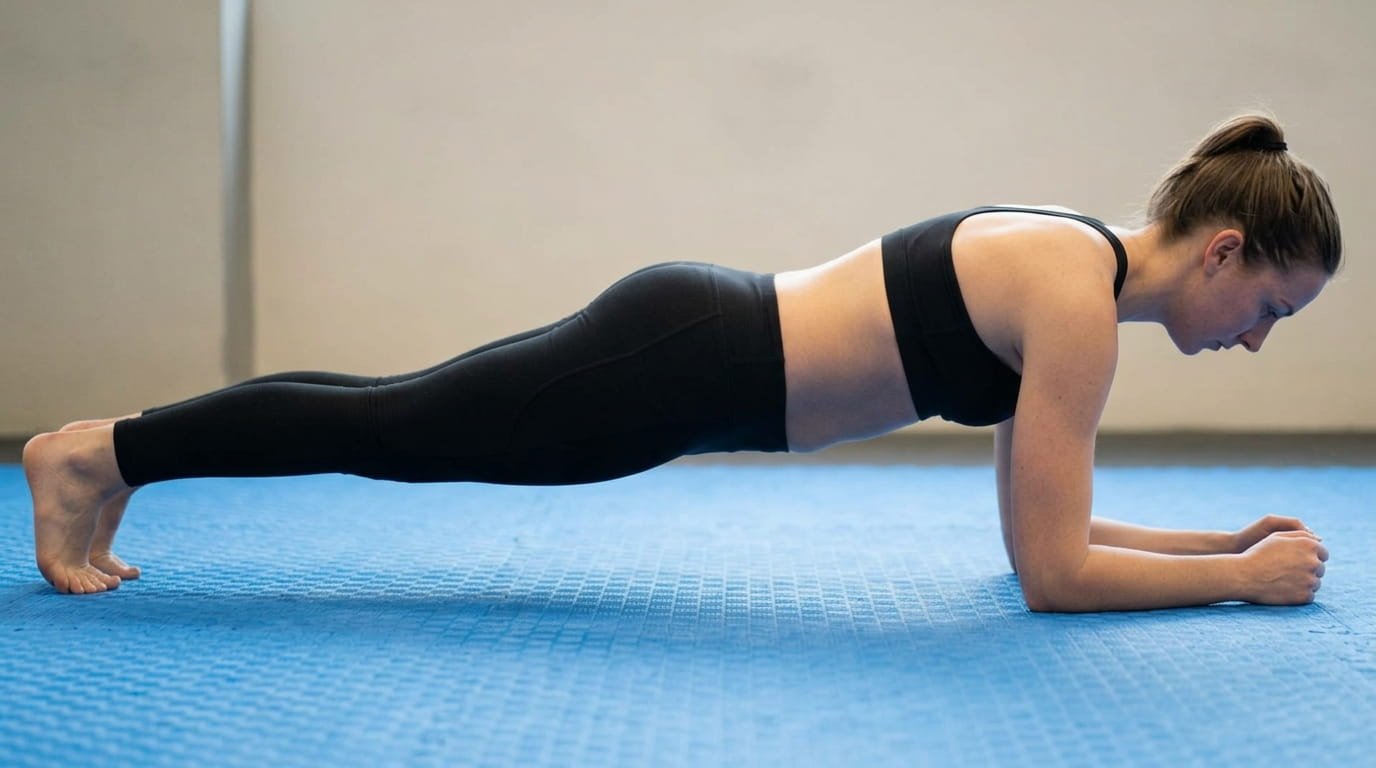
The forearm plank—often referred to as how to do a low plank—is the classic variation that heavily isolates the rectus abdominis (the “six-pack” muscles) and deep transversus abdominis. Here is how to do a forearm plank correctly from scratch:
- Step 1: The Setup: Begin by lying face down on a comfortable exercise mat. Place your forearms flat on the floor.
- Step 2: Elbow Alignment: This is crucial for joint safety. Make sure your elbows are aligned directly beneath your shoulders. Your forearms should be parallel to one another, forming a 90-degree angle with your upper arms.
- Step 3: The Lift: Tuck your toes under, ground them firmly into the floor, and push through your forearms to lift your entire torso, hips, and thighs off the ground.
- Step 4: Creating the Line: Imagine a perfectly straight wooden board. Your body must replicate this from your crown down to your heels. Squeeze your thighs and glutes tightly to lock your pelvis into a neutral position. This technique is exactly how to do a plank without hurting your back.
- Step 5: Breathe: Hold your gaze down at the floor, slightly ahead of your hands, to keep your neck relaxed. Maintain steady, deep breathing throughout the perfect plank hold.
2. How to Do a High Plank (The Full Plank Position)
If you want to transition your workout or prepare for upper-body movements like push-ups, you need to learn how to do a full plank, which is also referred to as how to do a high plank. The mechanics of how to do a plank position here require more shoulder and wrist stability:
- Step 1: Instead of placing your forearms on the mat, plant your palms flat on the ground. Your hands should be situated directly under your shoulders, just slightly wider than shoulder-width apart.
- Step 2: Fully extend your arms, but do not hyperextend or lock out your elbow joints. Keep a micro-bend in your elbows to keep the tension in your muscles, not your joints.
- Step 3: Step your feet back one at a time, pressing your weight into the balls of your feet.
- Step 4: Push away from the floor actively. Don’t let your chest sink between your shoulder blades; instead, imagine broadening your upper back. This is the gold standard for how to do a plank right.
Learning how to do a basic plank through either of these methods establishes the neurological pathways needed to safely attempt dynamic variations later on.
Part 2: Master the Form – Avoiding Pain and Perfecting Alignment
Many people search online for phrases like how to do a plank youtube or look up a how to do a plank video because they feel discomfort during the exercise. Visual cues are great, but understanding the biomechanics of how to do a plank exercise correctly is what prevents injury.
Let’s dissect the most common form failures and look at how to do a plank exercise properly to get maximum results.
Mistake 1: The Sagging Lower Back
When your core fatigues, gravity pulls your hips toward the floor, causing your lumbar spine to arch excessively. This pinches the spinal discs and leads to lower back pain. To practice how to do a correct plank, you must execute a slight posterior pelvic tilt. Imagine pulling your belly button toward your spine and tucking your tailbone under.
Mistake 2: Shrugging and Neck Strain
Craning your head up to look at a wall or dropping your chin to look at your toes both damage your alignment. To master how to do a correct plank exercise, your cervical spine must remain neutral. Look directly at the floor between your hands. Furthermore, pull your shoulders down and away from your ears to engage your lats and upper back muscles.
Mistake 3: The Hiking Hips
Lifting your butt into the air shifts the load away from your core and onto your shoulders. While it feels easier, it defeats the purpose of the exercise. If you are tracking how to properly do a plank, your hips should never be higher than your shoulders. If you cannot maintain this parallel plane, it is a sign that your core is tired, and you should rest.
If you ever feel lost during your home workouts, looking up a high-quality how to do a plank exercise video or checking out how to do a perfect plank youtube clips can help you self-correct by comparing your mirror form to a professional trainer.
Part 3: Planking for Beginners – Safe Modifications for Every Body Type
If you are completely new to fitness, attempting a standard floor plank can feel overwhelming. That is perfectly normal! Forcing your body into a position it cannot support leads to poor mechanics. Knowing how to do a beginner plank or a how to do a modified plank allows you to build foundational strength progressively.
How to Do a Plank for Beginners Step by Step
If you are figuring out how to do a plank for beginners, the best approach is to reduce the lever length of your body by using your knees. Here is how to do a plank on your knees:
- Start on your hands and knees in a tabletop position.
- Walk your hands forward slightly and lower your forearms to the floor.
- Move your knees backward until your body forms a straight line from your head down to your knees.
- Keep your feet relaxed behind you or lift your lower legs off the floor.
- Tighten your stomach muscles exactly as you would in a full plank.
This variation is excellent for understanding how to do a plank correctly for beginners without overwhelming your nervous system.
Vertical Progressions: The Wall Plank
What if you have limited mobility, joint pain, or are carrying significant extra weight? You don’t have to miss out on core training. Learning how to do a wall plank is a fantastic alternative.
To perform a wall plank exercise, stand facing a sturdy wall about two feet away. Lean forward and place your forearms flat against the wall, ensuring your elbows are directly under your shoulders. Step your feet back until your body is at an angle, lift your heels slightly, and brace your core. This is precisely how to do a plank if you are overweight or managing a recovery journey because it minimizes the intense pull of gravity while still waking up your deep abdominal walls. Learning how to do a wall plank exercise serves as an entry point for anyone to safely transition to floor workouts over time.
For younger audiences or family workouts, understanding how to do a plank for kids simply involves turning it into a game—like a “statue contest”—focusing on flat backs rather than intense muscular exhaustion.
Part 4: The Ultimate Directory of Advanced Plank Variations
Once you have mastered the basics and can comfortably hold a baseline position, it is time to progress. Incorporating diverse movements challenges your stabilizers, introduces rotational strength, and keeps your routine exciting. Let’s look at how to do a plank step by step across various advanced styles.
1. The Lateral Powerhouses: Side Planks
Standard planks work the front of your body, but your sides require attention too. To build complete core stability, you need to know how to do a side plank.
- How to do a side plank correctly: Lie on your right side on your mat. Stack your left foot directly on top of your right foot. Prop your upper body up on your right forearm, ensuring the elbow is right beneath the shoulder. Lift your hips high into the air until your body forms a straight diagonal line. Hold your left hand on your hip or extend it toward the sky.
- How to do a proper side plank: A common error is letting your hips drop backward or sagging toward the floor. To ensure you know how to properly do a side plank, push your hips forward so your chest remains entirely open to the room.
- Modifications: If stacking your feet hurts your ankles or balance, learn how to do a correct side plank by placing your top foot on the floor in front of your bottom foot for a wider base. Alternatively, perform the move with your bottom knee resting on the mat while keeping your hips raised.
2. Targeting the Posterior Chain: The Reverse Plank
Most core routines ignore the lower back, glutes, and hamstrings. Knowing how to do a reverse plank—also referred to as how to do a back plank—balances out your posture.
- Sit on your mat with your legs extended straight out in front of you.
- Place your palms flat on the floor slightly behind your hips, fingers pointing toward your toes.
- Press into your hands and heels, driving your hips toward the ceiling until your body forms a flat reverse plane. Keep your gaze looking slightly upward without letting your head drop entirely backward.
3. Dynamic and Functional Plank Variations
To take your athleticism to the next level, you can introduce movement into your holds. Here is a breakdown of advanced dynamic styles:
- How to do a commando plank (Plank Up and Down): Start in a standard forearm position. Place your right hand flat on the floor where your right elbow was, push up, plant your left hand, and rise into a high plank. Then, lower back down onto your right forearm, followed by your left. This is also widely known as how to do a plank push up or how to do a plank to push up.
- How to do a bear plank: Start on your hands and knees in a quadruped position. Tuck your toes under and lift your knees just one to two inches off the ground. Your shins should be parallel to the floor. This shifts massive tension onto the lower abs.
- How to do a Copenhagen plank: Place a bench or chair by your side. Place your top leg on top of the bench and support your upper body on your forearm. Lift your body up, keeping your bottom leg hovering underneath the bench. This is an elite variation that builds deep groin and oblique strength.
- How to do a plank twist (Plank Hip Dip): Assume a rock-solid forearm plank position. Slowly rotate your torso to the left, dipping your left hip down until it almost touches the floor. Return to the center, then rotate to the right. This targets your rotational obliques.
- How to do a lateral plank walk: Start in a high plank. Simultaneously step your right hand and right foot out to the side, then bring your left hand and foot over to reset into a plank. Walk back and forth across your mat to build shoulder mobility.
- How to do a plank shoulder tap: From a stable high plank with your feet spread slightly wider than usual, lift your right hand and tap your left shoulder. Place it down, then tap your right shoulder with your left hand. The goal is to keep your hips completely still during the hand transitions.
- Other Dynamic Variations: You can add intensity by exploring how to do a plank crawl, how to do a plank crunch, how to do a plank jump (jumping your feet in and out like a horizontal jumping jack), or adding a plank tap where you tap your toes out to the sides alternately.
Part 5: Timing, Frequency, and Programming – Quantifying Your Goals
A huge point of confusion in the fitness industry revolves around duration. People want to know numbers: “How long should I hold this position?” or “How often should I train?” Let’s look at the scientific and practical metrics of programming planks into your lifestyle.
How Long to Do a Plank?
When planning your sessions, your immediate question will likely be how long to do a plank or how long to do a plank for.
- The Daily Hold: If you want to build foundational endurance, figuring out how long to do a plank everyday comes down to quality over quantity. Holding a clean position for 20 to 30 seconds across multiple sets is far superior to struggling through a sloppy, painful hold for minutes.
- Milestones: As your core adapts, you can challenge yourself by testing how to do a one minute plank, moving up to how to do a 2 minute plank, or attempting an elite endurance marker like learning how to do a 5 minute plank sequence.
- The Psychology of Duration: If you want to know how to do a plank for a long time or want tips on how to do a plank for longer, focus on your breathing. Counting deep belly breaths rather than staring at a ticking stopwatch trains your brain to remain calm under muscular stress, which is the secret to how to do a plank longer.
Determining General Expectations
To understand your physical benchmarks, you should analyze common standard timelines:
- How long should you be able to do a plank? For the average healthy adult, being able to execute a steady, unyielding 60-second hold indicates a healthy level of functional core stability.
- How long should i be able to do a plank? If you cannot pass the 30-second mark without your body shaking violently or your lower back aching, drop to a modified knee variation to build up your baseline safely.
- How long to do a plank by age: Fitness baselines shift across demographics. Young adults (under 30) should aim for 60–90 seconds. Individuals between 30 and 50 can look at a 45–60 second target, while seniors can maintain fantastic spinal safety by hitting clean, consistent 20–30 second holds.
- How long do you need to hold a plank? From a therapeutic standpoint, research shows that brief, high-tension holds (10 to 15 seconds) performed for repeated sets offer incredible spine-stabilizing benefits without causing excessive muscular exhaustion.
Daily Volume: Reps and Frequencies
“Should I do this every single morning?” Let’s break down volume metrics:
- If you want to know how many planks to do a day or how many planks to do in a day, a great rule of thumb is 3 to 4 sets.
- When studying how many planks do i need to do a day or looking up how many times to do plank a day, remember that your muscles grow during periods of rest. Doing 3 sets of high-quality variations 4 times a week is often much better than forcing your body through hundreds of repetitive sets every single calendar day.
Part 6: Aesthetic and Weight Loss Goals – The Reality of Planking
Many people begin a core routine with specific aesthetic shifts in mind, searching queries like how long should i do a plank to get abs or how long to do a plank for abs. Let’s look at the direct relationship between body composition and core training.
How Long to Do a Plank to Lose Weight?
First, let’s clear up a massive piece of industry misinformation: you cannot “spot-reduce” fat. Doing hundreds of planks will not selectively melt fat off your stomach. When searching how long should i do a plank to lose weight or how long to do a plank to lose weight, you must understand that the exercise burns a relatively modest number of calories compared to running, swimming, or high-intensity interval training (HIIT).
However, planks build lean muscle mass throughout your deep core, shoulders, and glutes. Muscle tissue burns more calories at rest than fat tissue does, meaning that over time, incorporating structural holds into your weekly workout elevates your resting metabolic rate. For optimal fat loss, combine a clean nutritional strategy with full-body strength movements and use planks as your primary core stabilizer.
The Path to Visible Abs
If you want to know how long should you do a plank to get abs, the answer depends entirely on your overall body fat percentage. Your abdominal muscles are already there, but they are covered by a layer of subcutaneous fat.
Using a proper plank for abs training program strengthens and thickens the abdominal wall, making the muscles pop more prominently once you reduce your overall body fat through a caloric deficit. Incorporating structural holds like the standard low plank alongside lateral variations like the side plank ensures your entire midsection looks tight, pulled-in, and functionally athletic.
Part 7: Managing Special Conditions and Structural Limitations
Fitness is not one-size-fits-all. Injuries happen, and structural weak points require customized planning. Let’s look at how to navigate physical limitations while maintaining an active lifestyle.
Exercising Around Shoulder Issues
Because planks require you to support your body weight through your upper body joints, they can put pressure on your rotator cuffs and deltoids. If you are researching how to do a plank with a bad shoulder, avoid the high plank entirely, as the extended arm position places significant shear stress on the wrists and shoulders. Stick to a low forearm plank, or better yet, practice vertical wall planks to build up your scapular stability without overloading an injured joint.
Pilates and Holistic Variances
If you study alternative movement styles, learning how to do a pilates plank introduces slight variations in flow. In Pilates, planks are often integrated into transitions, moving smoothly from a plank pose into a downward-facing dog or integrating slow, deliberate knee pulls to focus entirely on deep, concentrated breathwork and pelvic floor activation.
Conclusion: Build Your Core Foundation At Home Today
Learning how to do a plank at home is one of the most empowering steps you can take for your overall health, athletic performance, and long-term posture. It is a true benchmark of functional fitness.
Rather than chasing an arbitrary time goal, always prioritize the quality of your posture. Keep your head neutral, pull your shoulders back, brace your abdominal wall as if you are expecting a punch, and squeeze your glutes. Whether you choose a gentle wall modification or push your limits with a dynamic commando sequence, consistency is your golden ticket.
Quick Reference Blueprint For Quick Workouts
To keep your daily training organized, refer to this easy visual breakdown:
| Target Goal | Recommended Variation | Ideal Set & Duration Structure |
| Complete Beginner | Wall Plank / Knee Plank | 3 sets of 15–20 second holds |
| Spinal Protection | Forearm Low Plank | 3 sets of 30–45 second holds |
| Oblique Development | Side Plank (Stack or Staggered) | 2 sets per side of 30 second holds |
| Lower Back & Glutes | Reverse Back Plank | 3 sets of 30 second holds |
| Elite Athletic Mobility | Commando Plank / Plank Twist | 3 sets of 45 seconds of continuous motion |